How to Create Glitter Resin Coasters at Home
-
Table of Contents
“Sparkle at Home: Craft Stunning Glitter Resin Coasters with Ease!”
Creating glitter resin coasters at home is a fun and creative project that allows you to personalize your living space with unique, shimmering designs. This step-by-step guide will walk you through the materials needed, the preparation process, and the application of resin and glitter to achieve stunning coasters. Whether you’re looking to make gifts for friends or add a touch of sparkle to your home decor, this DIY project is perfect for both beginners and experienced crafters. With just a few supplies and some patience, you can transform ordinary coasters into eye-catching pieces of art.
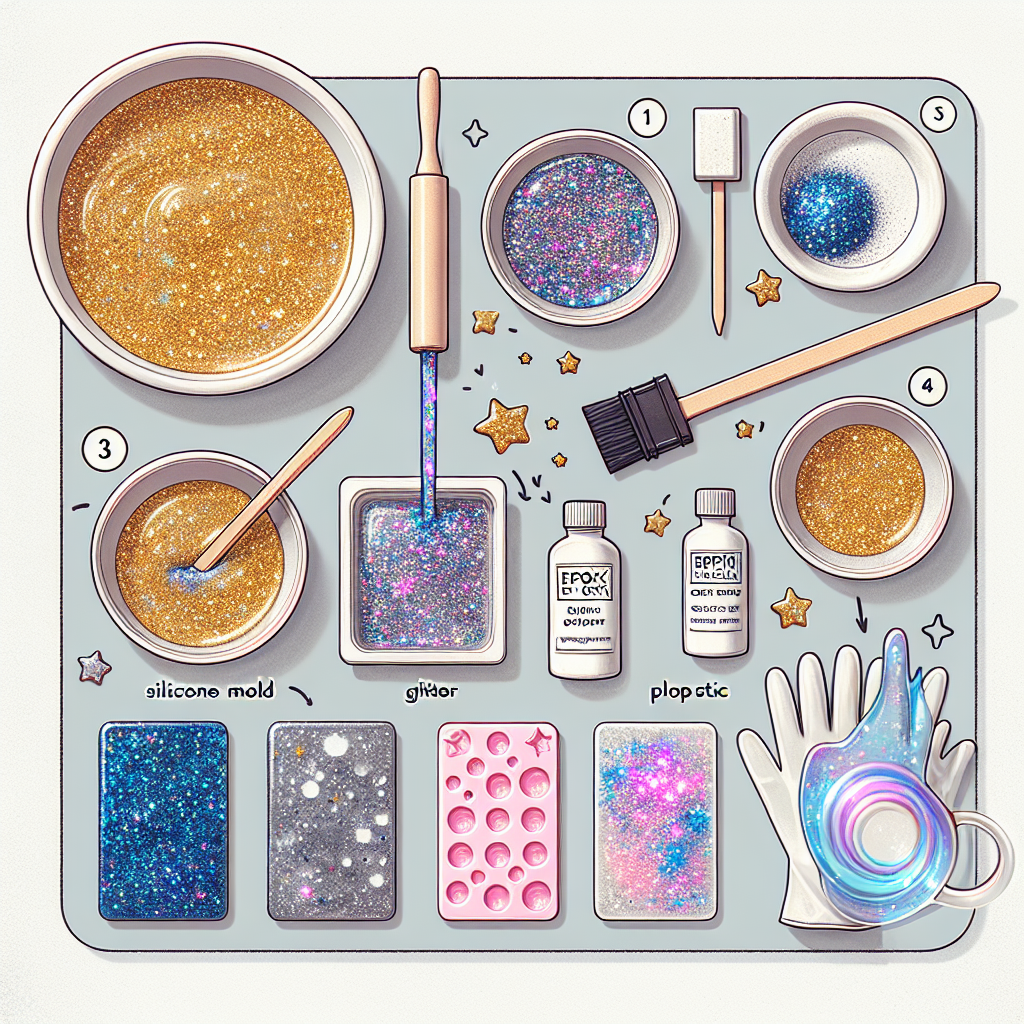
Materials Needed for Glitter Resin Coasters
Creating glitter resin coasters at home is a rewarding and enjoyable craft project that allows for personal expression and creativity. To embark on this endeavor, it is essential to gather the appropriate materials, as each component plays a crucial role in achieving the desired outcome. First and foremost, the primary ingredient for this project is epoxy resin. This two-part material typically consists of a resin and a hardener, which, when mixed together, undergo a chemical reaction that results in a durable and glossy finish. It is advisable to select a high-quality epoxy resin specifically designed for crafting, as this will ensure optimal clarity and strength in the final product.
In addition to the epoxy resin, one must also procure a mixing cup and stirring sticks. The mixing cup should be made of a material that is resistant to chemical reactions, such as silicone or plastic, to prevent any unwanted reactions with the resin. Stirring sticks, often made from wood or plastic, are necessary for thoroughly combining the resin and hardener, ensuring that the mixture is uniform and free of bubbles. Furthermore, it is prudent to have a scale on hand for precise measurement of the resin and hardener, as accuracy is vital for achieving the correct curing process.
Next, glitter is an essential component that adds a touch of sparkle and personality to the coasters. There are various types of glitter available, including fine, chunky, and holographic options. When selecting glitter, consider the color scheme and aesthetic you wish to achieve. It is also important to choose a glitter that is compatible with resin, as some types may not adhere properly or could cause discoloration over time. Additionally, you may want to include color pigments or dyes to enhance the visual appeal of the coasters. These can be mixed into the resin before adding the glitter, allowing for a more vibrant and customized look.
To create the coasters, you will also need a mold. Silicone molds are highly recommended due to their flexibility and ease of use, allowing for easy removal of the finished coasters. Molds come in various shapes and sizes, so selecting one that fits your design vision is crucial. Moreover, it is beneficial to have a heat gun or torch on hand to eliminate any bubbles that may form in the resin during the curing process. This step is essential for achieving a smooth and flawless finish.
In addition to the primary materials, it is wise to prepare a clean and well-ventilated workspace. Resin can emit fumes during the curing process, so working in an area with good airflow is important for safety. Protective gear, such as gloves and a mask, should also be worn to prevent skin contact and inhalation of any potentially harmful substances. Lastly, having paper towels or a cleaning cloth nearby will facilitate easy cleanup in case of spills or drips.
In conclusion, creating glitter resin coasters at home requires a thoughtful selection of materials, each contributing to the overall success of the project. By gathering high-quality epoxy resin, appropriate mixing tools, decorative glitter, a suitable mold, and safety equipment, one can embark on this creative journey with confidence. With careful preparation and attention to detail, the result will be a set of stunning coasters that not only serve a practical purpose but also showcase individual style and creativity.
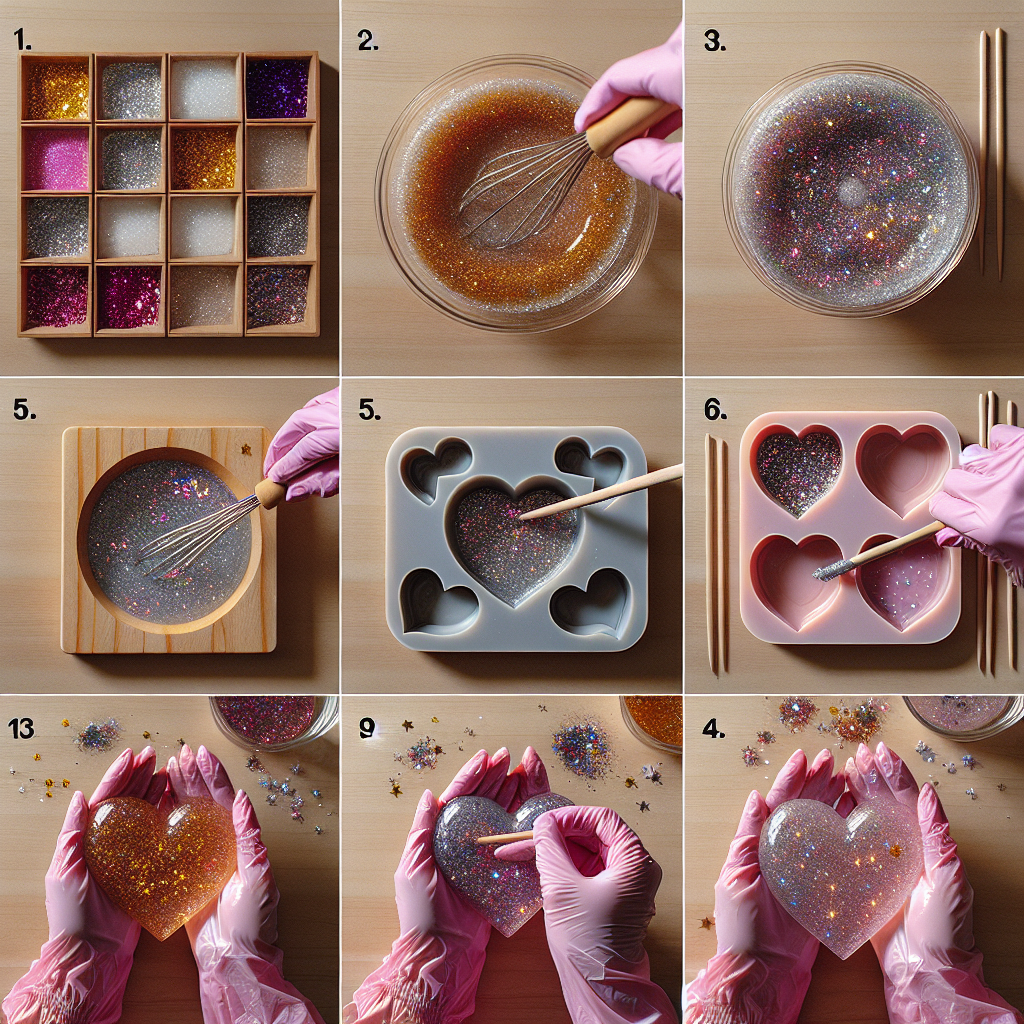
Step-by-Step Guide to Mixing and Pouring Resin
Creating glitter resin coasters at home can be a rewarding and enjoyable craft project. To achieve the desired results, it is essential to follow a systematic approach to mixing and pouring the resin. This process begins with gathering all necessary materials, which typically include epoxy resin, hardener, glitter, mixing cups, stirring sticks, and a mold for the coasters. Ensuring that you have everything on hand will streamline the process and minimize interruptions.
Once you have assembled your materials, the next step is to prepare your workspace. It is advisable to work in a well-ventilated area, as the fumes from resin can be potent. Additionally, covering your work surface with a protective layer, such as plastic sheeting or newspaper, will help prevent any accidental spills from damaging your furniture. With your workspace ready, you can now focus on the mixing process.
Begin by measuring the resin and hardener according to the manufacturer’s instructions. It is crucial to adhere to the recommended ratios, as improper mixing can lead to issues such as incomplete curing or a sticky finish. Using separate mixing cups for the resin and hardener, carefully pour the appropriate amounts into a larger mixing container. Once both components are in the same container, use a stirring stick to mix them thoroughly. It is important to stir slowly and methodically to avoid introducing air bubbles into the mixture. Continue mixing for the time specified by the manufacturer, typically around three to five minutes, ensuring that the resin and hardener are fully combined.
After achieving a uniform mixture, you can introduce the glitter. The choice of glitter can significantly impact the final appearance of your coasters, so consider selecting colors and sizes that complement each other. Gradually add the glitter to the resin mixture, stirring gently to distribute it evenly. This step is crucial, as it ensures that the glitter is suspended throughout the resin rather than settling at the bottom. Once you are satisfied with the amount of glitter and its distribution, it is time to pour the resin into the mold.
Before pouring, ensure that your mold is clean and dry. Carefully pour the resin mixture into the mold, starting from the center and allowing it to flow outward. This technique helps minimize the formation of air bubbles. If you notice any bubbles forming on the surface, you can gently use a heat gun or a torch to pop them. However, exercise caution, as excessive heat can cause the resin to cure too quickly or become discolored.
As you pour, take care to fill each section of the mold evenly, ensuring that the resin reaches the edges. If you are creating multiple coasters, repeat this process for each mold. Once all molds are filled, it is essential to cover them with a dust-free environment, as dust and debris can mar the surface of the coasters as they cure. Allow the resin to cure for the time specified by the manufacturer, which can range from several hours to a full day, depending on the type of resin used.
After the curing period, carefully demold the coasters. If any rough edges are present, you can sand them down for a smooth finish. Finally, consider applying a topcoat of resin for added durability and shine. By following these steps meticulously, you can create beautiful glitter resin coasters that not only serve a functional purpose but also add a touch of elegance to your home decor.
Tips for Achieving the Perfect Glitter Effect
Creating glitter resin coasters at home can be a rewarding and enjoyable craft project, allowing for both creativity and functionality. However, achieving the perfect glitter effect requires careful consideration of several factors. To begin with, selecting the right type of glitter is crucial. There are various types available, including fine, chunky, and holographic glitter, each offering a different aesthetic. Fine glitter tends to create a smooth, shimmering surface, while chunky glitter can add depth and texture. Holographic glitter, on the other hand, reflects light in a unique way, producing a captivating visual effect. Therefore, it is essential to choose the type of glitter that aligns with your desired outcome.
Once you have selected your glitter, the next step involves determining the appropriate amount to use. A common mistake is to either underuse or overuse glitter, which can lead to unsatisfactory results. Generally, a ratio of one part glitter to four parts resin is a good starting point. This ratio allows the glitter to be evenly distributed throughout the resin without overwhelming the overall appearance. Additionally, it is advisable to mix the glitter into the resin thoroughly to ensure an even distribution. Stirring gently but consistently will help prevent clumping and ensure that the glitter is suspended uniformly within the resin.
Moreover, the timing of when to add the glitter is also significant. It is recommended to incorporate the glitter into the resin mixture before pouring it into the mold. This method allows for better integration and prevents the glitter from settling at the bottom of the coaster. However, if you prefer a layered effect, you can pour a clear layer of resin first, let it partially cure, and then add glitter to a subsequent layer. This technique can create a stunning visual effect, as the glitter will appear suspended within the resin.
In addition to these considerations, the curing environment plays a vital role in achieving the perfect glitter effect. It is essential to work in a dust-free environment to prevent particles from settling on the surface of the coasters as they cure. Furthermore, maintaining a stable temperature and humidity level will ensure that the resin cures properly, resulting in a clear and glossy finish. If possible, cover the coasters with a dust-free container during the curing process to protect them from any airborne debris.
Another important tip is to experiment with different layering techniques. For instance, you can create a gradient effect by using varying amounts of glitter in different layers. This approach not only adds visual interest but also allows for personalization, as you can tailor the coasters to match your home decor or personal style. Additionally, consider incorporating other elements, such as dried flowers or colored pigments, alongside the glitter for a more dynamic design.
Finally, patience is key when creating glitter resin coasters. Allowing sufficient curing time is essential for achieving a durable and aesthetically pleasing result. Rushing the process can lead to imperfections, such as bubbles or uneven surfaces. By taking the time to follow these tips and techniques, you can create stunning glitter resin coasters that are not only functional but also serve as beautiful decorative pieces in your home. Ultimately, the combination of careful planning, attention to detail, and a willingness to experiment will lead to the best possible outcome in your crafting endeavors.
Q&A
1. **What materials do I need to create glitter resin coasters?**
You will need epoxy resin, hardener, glitter, silicone coaster molds, mixing cups, stirring sticks, gloves, and a heat gun or torch.
2. **How do I mix the resin and glitter for the coasters?**
Follow the manufacturer’s instructions to mix the epoxy resin and hardener in a mixing cup. Once combined, add your desired amount of glitter and stir thoroughly until evenly distributed.
3. **How do I cure the coasters after pouring the resin?**
Pour the glitter resin mixture into the silicone molds and use a heat gun or torch to remove any bubbles. Allow the coasters to cure in a dust-free environment for 24 to 48 hours, or until fully hardened, before removing them from the molds.To create glitter resin coasters at home, gather materials such as epoxy resin, glitter, silicone molds, mixing tools, and safety equipment. Start by preparing the workspace and ensuring proper ventilation. Mix the resin according to the manufacturer’s instructions, then add the desired amount of glitter and stir thoroughly. Pour the mixture into the silicone molds, ensuring an even distribution. Allow the resin to cure for the recommended time, typically 24 hours. Once cured, carefully remove the coasters from the molds and sand any rough edges if necessary. Finally, apply a sealant if desired for added protection. Enjoy your custom glitter resin coasters as functional art pieces.
Leave a Reply